first things first.
i. love. ruffles.
for paisley's curtains, i wanted to re-create something like these land of nod curtains.
so i went to target and picked up some cheap gray sheets.
BUT, then i saw these and changed up my game plan before i started cutting.
this gorgeous curtain is from urban outfitters and retails for 80 bones!
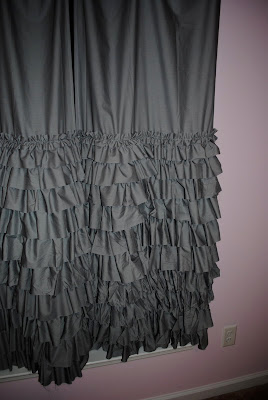
it was pretty darn easy to re-create.
and so much cheaper.
here's how mine turned out:
(the girls' room is still a work in progress)
here's my first attempt at a tutorial.
here it goes folks:
i picked up a twin size sheet set from target for $15, the cheapest rod i could find, and
ring clips to hang the curtains.
1. take the fitted sheet and cut off the elastic edge.
2. then i cut the fitted sheet into 6" strips. they don't have to be perfect,
especially since the style of the curtain is a little sloppy.
3. after i cut the strips, i sewed them together to make loner strips.
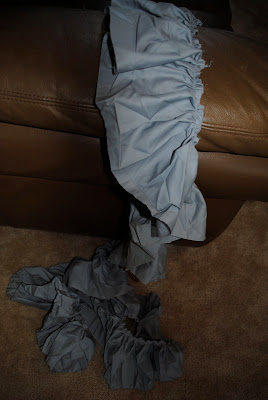
4. then i ruffled them. there are many different techniques to do this. because i'm lazy, i just run my strips through my sewing machine, and as i do so, i gather or pleat the material. the messier and more uneven, the better. i did this with about 1/2 inch allowance.

continue to do this till you have long strips of ruffly goodness
5. now get your flat sheet out and cut it down the middle length ways. i wanted two panels, and the twin sheet covered my window perfectly. you might have to cut them down more for a skinnier window. or you could choose to do just one panel. after you make the cut, fold over and hem the raw side.
6. once you have some ruffles ready, you need to mark your lines on the panels. i started from the bottom and marked a line every 4 inches. do this 7 times. i did 7- 6" ruffle strips. then i tapered them towards the top. more on that later...
7. after you've marked your lines, start sewing on the ruffled strips,
matching them up with the lines.
8. when you get to the end of the panel, stop the machine and cut off the excess ruffle strip
about 1" after the panel.
then fold under the excess twice.
(this part gets a little tricky)
finish stitching to the edge and backstitch 1/2".
lift up the foot of your machine and turn the panel.
finish off the ruffled edge without sewing the panel underneath.
9. finish sewing upwards toward the top of the sheet.
here's what i did, but you can change your up:
7 rows of 6" ruffles.
1 row of 5"
1 row of 4"
1 row of 3"
the last row was 2", but instead of the messy gathering,
i sewed down the middle of the 2" strip and pulled the one thread to gather it evenly.
(when you mark your lines for the 5",4", & 3" strips, mark them one inch closer than the 4" we started with.
10. i also trimmed the length of my panels to make them shorter and used that scrap fabric for more ruffle strips.
11. clip on your hanging rings and you're done!
this is my first tutorial, so please email or comment with any questions.
some things may need to be clarified , as i'm sure i may have missed something.
also, if anyone actually uses this, i would LOVE to see pictures.


